Yet a simple bit of home-made kit can turn all that garden “waste” into a resource, without ever leaving your driveway or buying a pricey machine.
Garden waste: when a pleasant chore turns into a weekend killer
From mid‑November onwards, the same scene repeats itself in countless back gardens. Hedges are clipped, fruit trees pruned, perennials cut back. The beds look neat. The lawn is visible again. Then reality hits: huge piles of branches and leaves sit there, waiting for a solution.
In an average suburban plot, one pruning session can generate several bin bags of material. Add in hedge trimmings and dead foliage and the volume climbs fast. Many people underestimate just how much biomass a small garden can produce once it’s all on the ground at the same time.
What looks like a tidy half‑day in the garden often ends with a full day stuck filling cars and queuing at the tip.
For most households, the reflex is obvious: load up the car and head to the recycling centre. Local authorities actively encourage it, and it feels like the responsible thing to do. But this solution comes with hidden costs: fuel, time, back strain from loading and unloading, and sometimes fees or booking systems.
There’s another cost too, less visible: those branches and leaves are rich in carbon and nutrients. Once shredded, they’re ideal for mulching beds or feeding a compost heap. Sending them away removes potential fertility from your own soil.
The clever idea nobody mentions: a DIY garden shredder in a bin
Many gardeners dream of owning a powerful shredder, then balk at the price, the noise, and the storage space it demands. The alternative is strangely absent from mainstream advice, even though it relies on tools many people already own.
From old bin to shredding drum
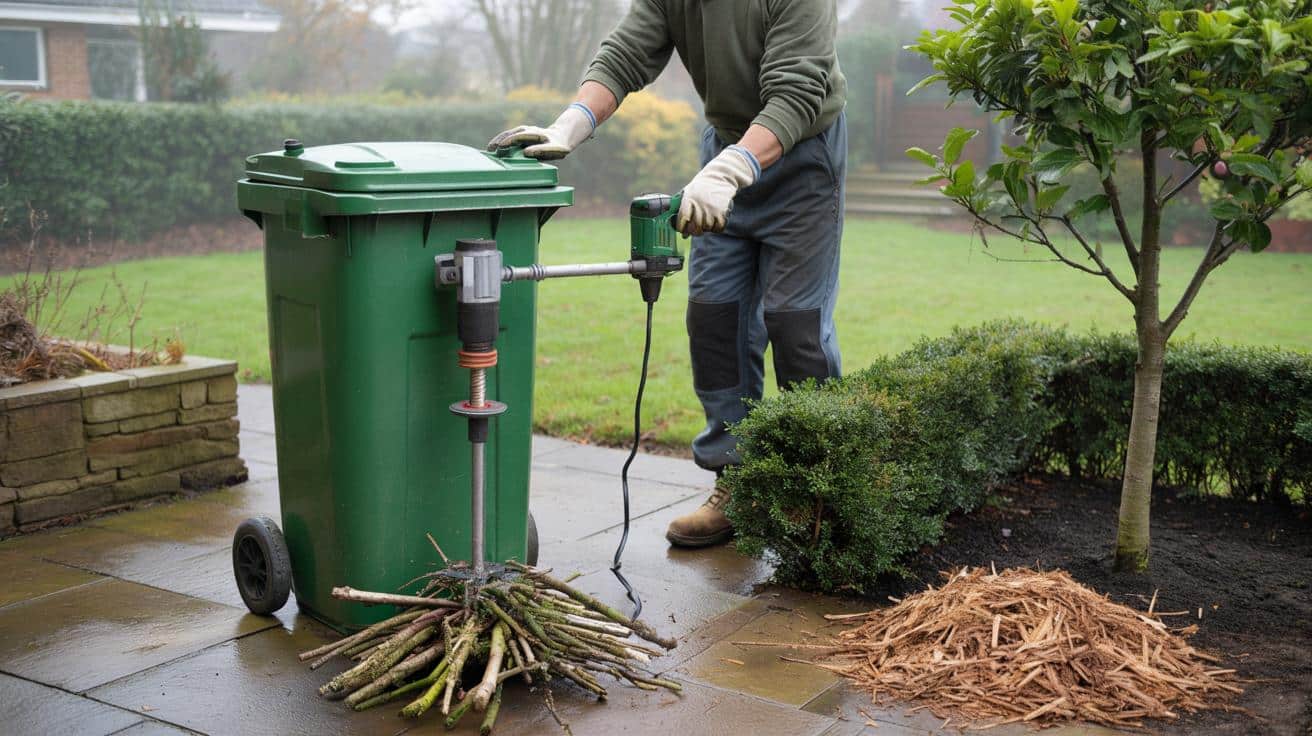
The basic idea is straightforward: turn a sturdy plastic bin into a simple shredding chamber and drive the blades with an ordinary electric drill. No purpose‑built motor, no large metal frame, no heavy machinery. Just repurposed gear and a bit of common‑sense engineering.
An unused wheelie bin, a handful of bolts, and a drill can give you a surprisingly effective home shredder.
➡️ Batterien falsch gelagert verlieren schneller ihre Leistung
➡️ Warum du nie kalte Milch in heißen Tee gießen solltest, Chemiker erklären warum
➡️ Schluss mit Färben: Dieser neue Trend kaschiert graue Haare und lässt Sie jünger wirken
The bin acts as the container where branches and stems are dropped. The lid becomes the moving part: inside it, you fix metal blades in a cross shape, similar to a large kitchen chopper. The drill, attached through the centre of the lid, spins the blades when you press the trigger.
How the home-made system actually works
At each rotation, the blades cut and tear the material inside the bin into smaller pieces. It’s not as fast or uniform as a commercial machine, but it handles small branches, hedge clippings and dried stems up to roughly 2 cm in diameter.
The shredded mix falls to the bottom of the bin. Once you’re done, you simply lift off the lid, tip out the contents at the base of your plants or onto your compost heap, and start again. There’s no lifting heavy bags into a car and no sweeping soil out of the boot.
Why does this trick stay in the shadows?
The method circulates quietly among keen DIYers and permaculture enthusiasts, yet rarely reaches mainstream gardening audiences or glossy magazines.
Perception of difficulty and safety worries
Many people back away as soon as a project involves spinning blades and power tools. The idea sounds risky or “too technical”, even though the build itself is quite simple for anyone comfortable with basic drilling and bolting.
The real barrier is often psychological: a sense that only professionals can build and use mechanical tools safely.
There is also a cautious attitude online. Bricolage fans fear criticism if they post homemade devices that don’t carry safety certifications. That reluctance keeps these ideas in private workshops, shared verbally among neighbours, rather than in big gardening channels.
Hidden under a flood of gadget content
Social media tends to amplify products rather than low‑tech solutions. Commercial shredders, robotic mowers and battery systems fit nicely into sponsored posts. A bin powered by a drill, built from scrap metal, isn’t selling anything, so it often goes unnoticed.
Building a DIY shredder: the basic recipe
For readers willing to get their hands slightly dirty, the core materials are simple and usually inexpensive, especially if you reuse what you already have.
Essential equipment and materials
- A robust plastic bin or old wheelie bin with a tight‑fitting lid (40–80 litres)
- An electric or cordless drill with a strong chuck
- Two to four flat metal blades (old mower blades or flat bar steel, around 18–25 cm long)
- Bolts, nuts and washers to secure the blades firmly
- Drill bits or a hole saw to pierce the lid
- Marker pen, tape measure, and a spanner or wrench
- Heavy-duty gloves and eye protection
Main steps, kept simple
First, clean the lid of the bin and mark the centre. Drill a central hole large enough to accept the drill bit or an adapter, and several smaller holes for bolts that will hold the blades.
Then, arrange the blades in a cross or star pattern underneath the lid, making sure they are balanced. Use bolts with washers to keep them rigid. The fastening must be tight to avoid wobbling when the drill spins.
A balanced set of blades and a firmly held lid make the difference between a rattling gadget and a functional shredder.
Attach the drill on top of the lid so that its chuck grips either the blade assembly or a central shaft fixed to it. Insert prunings and small branches into the bin, close the lid, and hold it down firmly. Start the drill slowly, then increase speed as the material begins to break up.
Turning shredded branches into real value for the garden
Once shredded, those trimmings shift from being a storage headache to becoming a flexible resource that supports soil health and biodiversity.
Two main uses: mulch and compost booster
Spread in a 5–8 cm layer under shrubs, fruit trees and hedges, the shredded material acts as mulch. It reduces weed growth, keeps moisture in the soil, and limits temperature swings in winter and summer.
On a compost heap, the dry, woody bits supply carbon. Mixed with kitchen peelings and fresh grass clippings, they help maintain a good “brown to green” balance, preventing the heap from turning slimy or smelly and keeping air channels open for microbes.
- Mulch: protects soil, cuts watering needs, and slowly feeds life in the ground.
- Compost: speeds breakdown and improves texture by adding structure.
- Paths: creates soft, natural walkways that suppress weeds between beds.
Time, money and carbon saved at the same time
Once gardeners stop driving their waste to the tip and start processing it on site, the cumulative gains build up quickly.
| Aspect | Trip to the tip | DIY shredder in a bin |
|---|---|---|
| Cost | Fuel, vehicle wear, occasional fees | Mostly reuse of existing tools and scrap |
| Time | Loading, queuing, unloading | Shredding in short bursts at home |
| Physical effort | Heavy lifting into and out of car | Shorter, lighter handling inside the garden |
| Environmental impact | Transport emissions, off‑site processing | On‑site recycling of organic matter |
Keeping organic matter where it grew reduces fuel use and steadily builds healthier soil under your feet.
Safety, limitations and common-sense rules
A home‑made shredder isn’t a toy, and it demands the same caution as any power tool. That doesn’t mean it’s reserved for engineers, but the right habits matter.
Key safety points
- Always wear gloves and eye protection.
- Never open the lid or put hands inside while the drill is plugged in or running.
- Avoid trying to shred very hard, thick or knotted wood.
- Keep children and pets away while operating it.
- Stop immediately at any unusual vibration or noise and check the fixings.
The system suits small‑diameter green waste. Large branches are better stacked for wildlife habitats, cut for firewood, or taken to a professional facility.
Beyond the gadget: changing how we think about “waste”
This simple bin‑and‑drill trick points to a broader shift in attitude. Garden clippings stop being something to get rid of and start being raw material for soil care. The garden becomes more autonomous, relying less on imported fertilisers and packaged mulch.
On a wider scale, if even a fraction of households processed their own green waste, local recycling centres would see fewer seasonal surges. Fewer vehicles would queue on Saturdays, and councils could allocate resources differently, instead of constantly expanding facilities to handle material that could have stayed on site.
One afternoon’s DIY can permanently change the direction of your garden waste: from the back of the car to the roots of your plants.
There are also community angles. A single shared DIY shredder, moved between a few neighbours, can multiply the benefits. People pool tools, share techniques, and often end up swapping plants or compost too. What began as a clever fix for autumn branches becomes a small piece of local resilience.
For gardeners thinking ahead to the next pruning season, the choice is simple: queue at the tip again, or turn an old bin and a drill into a quiet revolution at the bottom of the garden.